Monday, December 19, 2011
Holiday Greeting Cards for Preschoolers
Most of the kids in US have their winter break going on now. Usually the last day at school before the winter break is the day they have a little holiday celebration. That was on Friday Dec 16 at my daughter's preschool. Thursday night she decided she wants to give handmade holiday greeting cards to all her friends. Frankly I was little tired and was kind of reluctant. It was a very busy day and I had an order to complete which I had to ship early morning. But I didn't have the heart to curb her enthusiasm.
So we decided to keep it simple and quick so that we can make 15 cards and where she has to do at least 75% of the work.
This is how we made it.
Supplies you will need:
- Red Card stock Letter size
- Paper trimmer preferable
- Score board (optional but recommended)
- Bone folder
- Ruler
- Edge punch (optional)
- Scissors
- Silver stamp Pad
- Markers : Silver or any color that is visible on Red card stock.
- Peel and stick Felt : Green and brown
- Rhinestones red or any your like
Step wise instructions
-------------------------
1. Cut the card stock in desired size. We made 3 fold card so I cut the letter size paper in 3.5" width from the 8.5" side of the paper. So you will get 3 cards from one paper. Refer the picture.
2. Take one of the card piece and on scoring board score at 3.5" and 7" from the left edge of the paper.
3. Use edge punch to punch the edge of the third part of the card. Refer picture.
4. Draw a triangle on the back side of green the peel and stick felt. Draw a little rectangle on the back of brown peel and stick felt. Cut them using scissors. Kids can cut this using safety scissors or parents can help.
5. Let the kids stick the felt pieces and rhinestone as shown in pictures.
6. Ink the punched edge with silver stamp pad. Just run the stamp pad on the edge. This is an optional step.
7. Use the silver marker to write Happy Holidays inside the card.
8. Let your preschooler write their names if they have learnt it, my daughter did. If not them parents can help but let them tell the alphabets of their names. Most of the kids know them by now.
The cards are ready to be given. As they are 3 folds you don't need envelope if you want to keep them cute and casual. We just tied all of them together by a golden ribbon. Her friends loved it.
Happy Holidays!!
Tips:
1. Plan in advance, my daughter was a little tired after writing her name 10 times.
2. Handmade cards are best for preschoolers, they learn making them and have lots of fun too.
3. If you do not have scoring board simple use bone folder with metal ruler. That should do the trick.
4. If you do not have edge punch you can use decorative scissors too or just leave it as straight edge.
Sunday, December 11, 2011
Christmas Decoration 3D snowflake or Star
With the holiday spirit all around us this weekend our Christmas tree is also up with some ornaments from past year.
Though it is not a festival that we celebrate religiously, we love the festivity of this festival. So every year it is becoming a tradition at our house that we put a Christmas tree and decorate it with beautiful handmade ornaments. We also love to make other beautiful Christmas decorations and put them all around the house. Now my soon to be 4 year old daughter is adding to the enthusiasm of making the ornaments. She demands we make one ornament everyday till December 24th. Let us see if we can fulfill her wish. With the holiday orders keeping us busy at our little shop Navanka Creations, will try my best to keep her spirits up. Even if I am not able to post it at the blog everyday, we will keep making it and will definitely share them with you as and when we will get chance. There are some popular Christmas decorations and crafts that are loved by all. We will share with all our readers what we love in particular. Sometimes it is not known who has made it originally but if we find something interesting and worth learning we will share it with you with all the relevant details. You are also welcome to share any particular craft you like. You can leave the link in the comments or send us an email at craftideasforall@gmail.com
This particular project is a six point star or snowflake as some prefer to call it.
We have used dual color origami paper to get a better effect. You can also use single color or metallic origami paper for the project.
Supplies needed:
- 6 square sheets of origami paper( we used 5 inch square)
- Scissors
- Double sided tape
- Stapler
- Fish line
I found this video by kongo204 which shows how to make this star beautifully. I love the holiday music in the video too . Click here to watch the video.
Hope you have fun making this for yourself or another crafty friend.
Happy Holidays everyone.
Tip:
1. You can make it in a smaller size or bigger size depending on the size of the paper you have or your needs. Smaller stars make cute ornaments.
2. You can follow the steps with just one piece of paper and make that in a smaller size to make an ornament. They look cute too.
3. Make it all white or silver for it to be a Snowflake.
Sunday, November 6, 2011
Craft Fair and Giveaway Winner
It has been really busy here in CIFA camp. We are going to participate in our first craft fair and its keeping us real busy. We wanted to participate in one since long and finally took the plunge. It sure is fun and a lot of hard work :).
We will do a detailed post on our experience later but now we are just keeping our fingers crossed. We have been selling our items at Navanka Creations ( our etsy shop ) but this is the first time we will be showing off our items in front of so many people .... getting that butterflies in stomach feeling after a long time : ). It is a juried craft fair and there will be 25 other artists displaying their handmade items. The proceeds from the vendor table fees will benefit United Methodist Women.
Here are the details of the fair for our readers who live near Bellevue, WA. Do drop by for the fun event if your are nearby.
Location : First United Methodist Church of Bellevue WA
Date and Time : Saturday, November 12 · 9:00am - 3:30pm
And now for the winner of TommeeTippee Giveaway. The winner is Prajakta Moghe. Congratulations, your sippy cups will be reaching soon. .
Wednesday, November 2, 2011
Spooky Scary Village DIY Halloween Decoration
This year Halloween was extra special as my daughter and my husband were all so excited and crafty about it. Really appreciate the effort made by my crafty daughter and hubby. I was all too busy preparing for The Craft festival I have to participate in. Though I did provide a helping hand here and there like handing the scotch tape or finding the paper or crayon.
It was fun to watch her talking to the Pumpkin Bat,Mommy's Pumpkin, Incredibles Pumpkin,Spider Pumpkin, Ghost, Scary village house (made from lego). She is reading stories to them since it was put on display. Halloween is over and she still wants her scary village and the people pumpkins that live there. It is going to stay for a while looks like.
Salient features:
-We have used the faux spider web for the first time. It was a learning experience to figure out how exactly it will become a web.
-All the bugs, bats etc from kids tube mini bugs collection (National Geography) were put to good use and they hang really well on the web.
-All toilet paper roll tube crafts made good decoration.
-Crafts done by my daughter at her friend's house made good deco too. You see the scary village has to have a tree (again a preschooler's imagination).
-Mega Blocks for making a scary tower.
-Lego blocks for making a cute little Ghost.
-Paper Crafts made at Preschool(Pumpkin, Owl, Fall wreath) all were there.
-Pumpkin paper Lantern.
-Dried and silk fall leaves.
-The different levels for better display were created using different size of cardboard boxes and covered with a halloween theme black and orange table cover.
-Lots of Scarecrow because we need lots as we need to scare more.
-Paper silhouttes for the window decoration of a really scary village made with black construction paper, white crayon and hand cut foams in the shape of bat, ghost, pumpkin.
-Paper Silhouttes of bat and witch too.Added later as it is incomplete without witch.
- The best an innovative idea I must say was using Humidifier to give the haunted effect from colored smoke. Covered the humidifier with white garbage bag and made eyes with foam stickers, toilet paper roll to make a chimney and the color from the disco ball added the haunted feel to it.
-All trick or treat containers found a place in this scary village too. Whether it is Green Monster from Happy meal from Mcdonalds or the famous pumpkin container.
- And 2 days before Halloween we decided, we should definitely have a carved pumpkin and here you go ..a smily pumpkin (Pumpkin has to be happy) was carved to welcome all our cute and scary guests for the little Halloween Party we had. We used a camping light lantern to light it as the LED tea light we had were not giving enough light and we were really running out of time to get one with more power.
And so on...many more little toys, incomplete yarn doll, cats etc.
I guess we will remember Halloween 2011 for a long time to come. Hope you all had a wonderful time decoration and trick or treating.
Tuesday, October 11, 2011
Crazy Incredibles Pumpkin Craft for Preschoolers
Like last year this year also we participated in the Pumpkin decoration activity for kids, organised by Michaels
My 3.5 yr old daughter was so excited for the event. She just could not wait for the event to begin. You have to buy the pumpkin and they will provide the supplies and parents or care taker has to help out kids.
This crazy pumpkin design is 100% her own creation. I guess she was actually inspired by the one they kept for demo purpose. But the color combination and the eyes are all her imagination.
She had a blast making this one. It took a long time but considering her age I guess that was expected.We were very happy to see her happy.
Supplies you will need:
-Faux pumpkin
-Self sticking Foam sheets-black and white
-Pom Poms different sizes, different colors
-Google eyes :Jumbo size
-Chennile stems or pipe cleaners
-Safety scissors
-Pinking scissors
-craft knife
-Tacky Glue
-Feathers various colors
-Pencil/marker
Step wise instructions on how to make this Incredibles inspired Crazy Pumpkin
1. On a self sticking black foam sheet draw the shape of the eye mask. Cut it.SHould be done by adults or may be Adult supervision if the child is used to cutting.
2. Similarly on a black self sticking foam sheet draw the smile of the pumpkin.Cut it.
3. On a self sticking White foam sheet draw pointed crazy teeth and cut with pinking scissors or normal scissors are also fine.
4. Use tacky glue to stick pompom. For the rest of it normal glue is also fine.
5.Stick the feathers, google eyes etc.
6. For the crazy curly hair, roll the chennile stems or pipe cleaners on a pencil or marker and take them out.Some kids need Adults help to do this till they get hang of it.
7. At the end of the curly hair, just insert a little pom pom of contrasting color.
8. To insert the chennile stem hair, use something pointed to make hole, like pointed scissors or craft knife. Adults should make the holes and let the kids insert the hair.
Use you imagination to make it more crazy or different crazy. The possibilities are endless.
Have fun. Happy Halloween!!.
Tips:
-Use tacky glue in moderation. Works really well with little amount and sticks pretty quickly.I loved this one as kids get frustrated when things take time to stick.If you take too much tacky glue it will take longer time to dry and hence does not serve the purpose.
-For making hair, little kids might get tired, Adults please help them. Little hands get tired pretty quickly.
Monday, October 3, 2011
Digital Journaling for New Parents and a Cool Giveaway Enter to win
In last couple of months few of our friends were blessed with babies and there are some more who are due in next few months. With the amount of lovely wishes pouring on facebook, while they wait for the baby and on the baby's arrival,it made me wonder whether there is a way to capture all these wonderful wishes.
Coincidentally, during the same time Caroline from TommeeTippee introduced us to their new website appropriately named The Day baby was born. It offers a free service that automatically gathers information about the day your child was born, based on your selections, to create a storybook that you can share with family and friends.
Digital journaling is getting very popular these days.Something as special as a new baby is a perfect time to do Digital Journaling. With a new born at home, parents are busy taking care of the new member. Definitely, everybody is excited and the messages keep coming from all the well wishers. With social networks getting so popular and facebook being the most popular one, many of them are on facebook. It would be great if those special moments are captured in an easy and quick way, without spending much time and energy. Digital Journaling comes handy in such situations.
A free web application like The day baby was born is a wonderful way to start the story telling.
I must say I was really touched by the sample storybook they have put together.
When my daughter was born I did make a small Digital storybook of a different kind but, it definitely didn’t capture the facebook messages etc. Like many of us, I still have piles of memories yet to be put in a proper scrapbook someday. And all the parents out there will agree that it gets busier with every passing day.
Take advantage of the technology and get going, do give this Digital Journaling a try. In this web application the information is captured from the facebook wall post, news sites and data feeds selected by you. You can choose to make it extra special and more personalized by adding pictures and stories from your pregnancy and delivery. You do have an option to write a letter to your baby which I think is a wonderful concept.When you are ready to share the news
- it creates a Personalised pregnancy and Birth Announcement on Facebook
- A storybook that you can share online.
The Day Baby was born digital story book is a wonderful keepsake for you as a parent and for your child. It is definitely something to kids would love to know - how the world was when they were born and how much they were loved.
Since,this is a web application with captures data from Facebook, they do require you to sign up and allow to access basic information from Facebook. They do have strict privacy policy. Before you sign up, make sure you understand that. As far as we could see, it is similar to those of other facebook web applications.
And here is the fun part.Caroline Trainor from Tommee Tippee
has generously offered to send the giveaway of Explora Sippie Cup to one lucky reader.
For participating in the GIVEAWAY
-comment on this post, make sure you include your email address within your comment if you don’t have a blog or website where your address is easy to find.
-You can earn one extra entry for liking our online shop Navanka Creations on facebook .
-One more entry can be earned by liking our blog on facebook
Tell us if you have done this within your comment or as a separate one.
This giveaway is for US resident only.
Giveaway will close at the end of dayMonday, October 31st.
Winner will be selected by Random.org Winner will be Announced on this post. The giveaway will be sent to the winner directly by Tommee Tippee
Please note: I have not received compensation in any form from Tommee Tippee for doing this review and Giveaway.
Friday, September 30, 2011
Feature Friday - Paper Quilling Hair Pins from our Etsy Shop
As our regular readers know we have an etsy shop and we have been devoting a lot of our creative energies these days towards developing new items for our shop.We are starting a new series.Feature Fridays where we will share some new items from our etsy shop Navanka Creations. The first one in the series is our new line of paper quilled hair pins.We like to call them "Cute Clippies". It was so much fun creating these. Hope you like them. Would love to get some feedback :).
Here are few pics of the clips packed and ready to ship.
Sunday, September 18, 2011
DIY Play Gym for Parakeet or similar birds
We got a Parakeet in the month of Feb this year. It took a lot of convincing from my husband and my daughter to finally get one for our home. I was not sure if I will be able to take care of a bird. Both my husband and daughter are pet lovers. So after an Aquarium finally we had a Parakeet for our house. My daughter has lovingly named her Rainbow as at that time she recently discovered the beauty of Rainbow and she found this bird as beautiful and colorful as Rainbow. So, now she is Rainbow and we are not allowed to say that she is a bird. She is a part of our family and her name is Rainbow. My daughter can say her Birdie though from time to time.
We do keep Rainbow outside her cage for quite a while, she stays in her cage also for food and sleep.
We have been planning on buying a play gym kind of set up for her from long. We have added lot of toys but were not happy with the play gym kits which were available in the pet shops. More so because whatever we saw we thought we can make better than that ourselves and that too at a fraction of price. Well not so sure of the price part but, we took the plunge. The idea of making the play gym on or own was very exciting to both my daughter and crafty hubby (who hardly gets a chance to be crafty). This weekend we took the plunge and voila the colorful Play Gym is ready.
Supplies-
Wood tray
Wood dowels various sizes
Wood craft ready to paint house
Wood craft ready to paint Ladder
Acrylic Paint non-toxic
Wood glue
Wooden beads and string
Ready made Bird toys like mirror with bells etc.
Nail
Paint brushes
I am really happy with the result and so far this is the biggest wood craft project we ever did.It is a great example of a Family craft where you can involve a 3 year old too.
She did most of the painting, esp the bird house and the ladder.I have never seen so excited or involved for any craft as such.
The hard work paid off when our Rainbow also enjoyed and explored the Parakeet Play Gym.
Tips: All the wood craft ready to paint pieces were bought from Michaels and Joann.
It took a while to find non-toxic acrylic paint, but it is important to get this as it will be used by Parakeet. Other kinds might be harmful to the bird.
Be careful about using non-toxic glue too.
Friday, September 16, 2011
Paper quilling leaves card
I made this card for our ETSY shop Navanka Creations some time back. I wanted to design something that could be given to men as well as women and for all occasions. I love the shaded quilling strips and I guess it did add dimension to this design.
Its surprising how the weather here has switched over to Autumn in a day. This entire week it has been cloudy and rainy :(. So from amazing summer in Seattle we are back to the Rainy Seattle.Back in India, with the hot summers rains used to be so welcome..Monsoon was my favourite season. How things change when you have too much of anything :).
Fall is beautiful here so thats one thing I am looking forward to. With fall approaching I am thinking of revisiting this design with fall color shades. What do you guys think? Will love to get your opinion.
Hope to get some sun this weekend.
cheers
Sunday, September 11, 2011
Baby Shower Greeting Card with Paper Quilling
It was one of my friend's baby shower today. I made this card for her. As you can see, she is having a girl ! Baby showers are fun here ...we do both the traditional Indian God Bharai ( Blessing the would be mom and baby) ceremony as well as the Baby Shower party with fun games and of-course lots of food. So its like the best of both worlds.
Its their first child. I wanted to make something special and cute for them. And also something new....repeating designs is not much fun. So yesterday night I made this cute little pink and white onesie. I used crimped strips to get that frilly girly feeling for the onesie. I also decorated the envelope with a bow and tag for message. I ended up having a late night ( means less sleep when you have a toddler who wakes up at a fixed time in the morning) but her reaction when I gave her the card today made it all worth it. She simply loved it and I made up for the lack of sleep with a late afternoon nap after the function was over. Off to sleep now ...have a fun Sunday all of you!
Wednesday, September 7, 2011
Beautiful coasters with paper quilling in colors of rainbow
I love rainbows. They are one of the nature's creations that bring a smile on every one's face regardless of age. Somehow they also remind me of my childhood and care free days of summer.
Recently I made these rainbow coasters for our Etsy shop Navanka Creations. It took more than 100 quilling strips and quite a while of rolling I would say to finish these coasters :) .I did follow the rainbow colors sequence inside out ... remembered my childhood days and how we used the acronym VIBGYOR to remember the rainbow colors in sequence.
It was also part of a challenge in one of ETSY teams, ETSY paper's rainbow challenge. Its a group of very talented people and it was fun to see various rainbow creations.
Here's a beautiful poem ...enjoy and have a Happy Day!
God is the greatest artist
To whom no one can compare,
Streaking sunsets very beautiful,
Painting rainbows in the air.
Brushing green the hillside scene,
Blotting blue the sky above,
Splashing flowers 'cross the ground beneath,
Shading white clouds with His glove.
Of the wonders God has made
There is none that is so fair
As the smile He paints upon your face
When you realize He's there.
Labels:
coasters,
navanka creations,
paper quilling,
Rainbow
Tuesday, August 30, 2011
Creation featured on Whole Port
This month has been a very exciting one.We have been busy participating in challenges and developing new products. Right now we have few orders to fulfill for our online etsy shop Navanka Creations. It is a wonderful feeling to be busy doing what you love.
Amidst all this, it was great to be nominated for Best blog for kids craft by one of the most popular magazines Parents here in US.
Recently, our Origami Chocolate bowl creation was featured on the Wholeport blog. Remember the Origami Chocolate Bowl for Creativity Expo challenge that I shared earlier on the blog.
It was wonderful to see our entry featured as one of the 6 selected pictures from the numerous entries by super talented artists.
This Origami Chocolate Bowl was published on their blog as well when they listed Origami creations.
Seems they liked the creation and the picture and they used that when mentioning the last date for voting for Creativity Expo Challenge on their facebook page.
We are delighted. Thanks Wholeport. Thanks to all our friends who voted and left wonderful comments on our personal facebook pages, on Wholeport blog, Wholeport facebook page and our blog. Your kind comments and votes are always appreciated.
Monday, August 22, 2011
2011 Parents Best Craft for Kids Blog Nominee
It gives us immense pleasure to get the nomination for The Best crafts for Kids blog from Parents Magazine for the year 2011. We have been a great fan of Parents Magazine for long. Its like an honor to be nominated.
Parents.com brings you the best mom blogs and dad blogs on parenting advice and tips, parenting news, baby and toddler development, raising kids with special needs, adoption, homemade baby food, craft for kids, books for kids and more.
We thought it is a great opportunity to share some of our all time favorite pictures. It does have some of the crafts made by all the kids we worked with or rather we had the time to take pictures of and some most liked crafts.
Please vote for us and help us be the winner. It will mean a lot to us.
To vote simply click on the badge on the right hand corner of the blog or simply click here.
Thanks for reading and following.Kudos to all the amazing kid crafters and their parents for encouraging these little artists. Its been an amazing crafting journey and is becoming more fun filled one with you in it.
Saturday, August 20, 2011
Handmade Welcome Baby Girl Greeting Card with Paper Quilling
I made this Welcome Baby Girl greeting card as a custom order for a friend. She wanted a big enough card for atleast ten people to sign and write their message. So I made this card with a 8.5" x 11" card-stock folded in half. Since the card size is non standard I also made a custom envelope for the card. For the rattle and stroller I used crimped strips. For the lace I used Martha Stewart border punch.
I simply love quilled feet. They just look so delicate and adorable with tiny toes and remind me of the time when the nurse took my son's footprints in the hospital. I have been making a lot of baby cards these days. Some for our etsy shop Navanka Creations and some for friends. Two of my girlfriends are expecting. Looks like will be making some more :).
Thursday, August 18, 2011
Wooden Bead Necklace Preschool Craft
It gives me immense pride to share this craft with you all. This is my daughter's first attempt at bead craft. Both of us are so proud of this project.
I was just waiting for her to turn 3 year old so desperately that she gets to use things which are labelled as small parts, only for 3 year old and above. She was ready before that but still I was waiting.
This is one of the simplest crafts if you look at it. But, definitely a feel good craft for a preschooler. They do get sense of achievement after completing this.
I could see it is a little challenging for them.
It is very good for honing their fine motor skills.Also, they get to learn and experience patterns.
It can be tiring too, so its ok for parents to help in between just to help them to complete the project. To be honest, at the end of it my daughter was all worked up and the tiny fingers wanted rest, but the little heart wanted to wear that necklace as soon as possible. So I pitched in.
She got this cute box she got the other day from Joann, its a $1 box which comes with 4 crayons on top to color this little ballerina.
Once the necklace was completed she wore it. But she had a box ready to keep it safe.
I think it is great craft for kids.
Useful Tips:
1. Wooden beads were bought from Dollar Tree. Not all of them are perfect. Parents might want to sort the good ones and give to kids to avoid frustration.
2. For cording the beads your best bet is thin elastic as shown in the picture. I tried jewellery color cords as well as hemp meant for jewellery making, beading and crafting, but they are not great for little hands. The tip does not remain stiff for long. Craft needles meant for kids are too thick for this project.
3. The beads I bought had one sample elastic. More can be bought from sewing supply store. Walmart, Michaels and Joann have them.
4. For quicker projects you might want to make a bracelet.
5. For preschooler boys, you might want to get square beads in blue, black, red, orange or brown.You can also select a different box.
Tuesday, August 16, 2011
Cupcake birthday card
This summer we have been attending lot of Birthdays :). I made this cupcake card for my friend's daughter. She turned four and is very very sweet..just .like a cupcake! She had been telling everybody for weeks that she is almost four and is now a BIG girl. The way she would bring up her coming birthday was simply adorable.
Here's a closeup of the cupcake.
I loved making this card and am going to make one for our ETSY shop too. For those of us who are new to our blog, you can check out our ETSY shop Navanka Creations here .
Days have started to get shorter and I can not believe summer is almost over. Wish it stays like this a little longer :) .
Wednesday, August 10, 2011
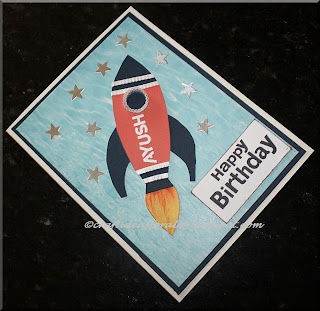
Rocket theme birthday card
I made this one for my friend's son's 6th Birthday. I initially planned to make the card entirely with quilling but ended up making it with paper piecing and some quilling accents. I personalized the card with his name on the rocket / space shuttle. For the stars I used stickers.
I think this could be a cool wall art for a Boy's room also. I always find it hard to make creative stuff for boys..they need cool stuff and my first instinct is to make beautiful ( read flowery) stuff. With my son growing up, I do sometimes think of how will I make crafting fun for him. I think the best way to get boys interested in crafts is to incorporate their interests in the project..like sports, animals, cars etc. For pretty and cutesy crafts...will have to borrow my niece :).
Monday, August 8, 2011
Toilet Paper Roll Tube Puppets
My 3.5yr old daughter is getting more vocal about her demands now. Whether it is what she wants to watch on tv or what craft she wants to do. I can definitely feel she is growing and that it is going to be a challenge to meet her expectations. One such afternoon was couple of days back when her summer camp got over. She insisted that she wants to make puppets and she wants to make them now. She was very much persistent in using these toilet paper rolls which, by the way we have been saving from ages to make some craft in future.
This is one of those unplanned crafts which was made as she wanted it to be.
Supplies you will need :
- Toilet paper roll tubes : 2 no.s
- Colored paper
- Tissue Paper
- Ribbon
- Markers
- Card stock
- Craft sticks
- Tape
- Scissors
- CraftGlue
- Foam brush
- Small plastic milk bottle cap
Her demands:
1. Puppet should be a boy and a girl.
2. The boy's hair has to be yellow.
3.Girl should have two ponies with ribbon.
4.I (my daughter) have to be the great helper to make it. Which literally means she will make it and Mommy is only to help.
5.Boy should have buttons.
Keeping those requirements/demands in mind. This is what we made. She was more than happy to play with the puppets that she made herself.
We ended up making one more puppet, a flower puppet. It is just foam flower stickers on the craft stick.
Hope the pictures are self explanatory.If you have any questions about this, please don't hesitate to ask. I will be more than happy to explain.
Tuesday, August 2, 2011
Paper Quilled Butterfly and Flowers
The day I tried quilling for first time I made these butterfly and flowers and that project has been proudly hanging in my corridor since then. One of my students wanted to make the same design and that's what we made this Friday. It was a fun project. She saw crimped strips in one of the cards I made and wanted to try that and I do think it looks nice.
This project brought back lot of memories of how I stumbled upon the art of quilling and how it has become such a big part of my creative life!
Cheers to quilling :)
Monday, August 1, 2011
Paper Quilling Khanda
The Khanda is one of the most important symbols of Sikhism . In the symbol the sword to the left represents truth, and the sword to the right represents the willingness to fight for what is right- dharma (religion). The circle in the middle means that there is only one God, never beginning and never ending. One of my students is a Sikh and we were quite excited about making a Quilled Khanda.
We took a printout of the Khanda symbol outline and traced it on a tracing paper. Then carefully we arranged all the coils pinched into petal shape to fill the outline. Then we transferred the finished Khanda on white cardstock. I have to tell, it took us quite some time and patience. Its tough to get a seven something girl to make so many coils. It took us two sessions to complete the project and I did chime in to make some coils :).
She is planning to make a few of them and gift them to her relatives in India when she travels there this winter. I am sure they will be touched to receive such meaningful handmade gift. Here is Sirjan with her beautiful creation.
Friday, July 29, 2011
Fancy Origami Chocolate Bowl for Creativity Expo Challenge
Recently I came across this Creativity Expo Challenge organised by Wholeport- A craft supply company.
This is my creation for this challenge.
Description of Creation: A lovely fancy Origami Chocolate bowl/Centerpiece was made by strengthening the origami paper with heavy card stock in between and red metallic paper on top. The result is a fancy and sturdy bowl that can be used to serve chocolate at home or office or at birthday parties. This creation tells how you can impart the desired strength into Washi (A particular kind of Origami paper) with composite construction technique. I am always fascinated by the vibrant color and design of Washi paper.Of the four sample papers they sent I liked this the most. I guess this paper with Red and golden colors is perfect for holding golden and red Hershey's chocolate.As red and golden is always associated with festivity and happiness, I thought this would be perfect.
Name : Nimisha Singh
Title of Creation: Fancy Origami Chocolate Bowl /centerpiece
Supply: #9 Origami Paper
I need your help to win this contest. The rules say that the entry with maximum likes and comments is going to win.
If you like this creation of mine,Please go to this Wholeport's facebook page by clicking here
and in the Creativity expo photo Album like my creation and leave a comment.
Thanks for your support.
Note : If you are on facebook you can click on the photo of this Origami Bowl at our facebook page Navanka Creations it will take you to the post at Wholeport.
You might have to like Wholeport's fb page to leave a comment. (Technicalities of how fb page works, sorry can't help it.)
Origami Boat made in Craft Class- Teaching kids Maths through Art
These lovely colorful boats are made by students of my craft class.
We have been experimenting with Origami since long. My love for Origami increased during my visit to Tokyo a while back. It seems to me that Japan is the heaven for craft enthusiasts.
Every nook and corner is so beautiful. Whether is a restaurant, hotel or workplace, you are bound to find something creative.
I still remember the lovely pair of origami peace crane on the table in the hotel I stayed.
They were just perfect. I knew origami that time but it’s been a while I practiced that. I guess after that I made it a point to practice anything in Origami that I liked a lot.
It was a pleasure to introduce Origami to my students. We started with fundamentals of Origami.
Things learnt in Origami Classes
- Meaning of Origami
- Brief history of Origami
- Types of Origami Paper
- Basic Origami Techniques
- Basic Tools
- Modular Origami
- Beginner level Origami creations like Paper Cups for Snacks, Paper Fan,
Paper Butterfly, Paper Airplanes, Paper Boats, Paper Box with lid,
Paper Basket.
- Basic Geometry concepts - Revision of geometry parents!!
Best part of Origami is that you do not need to have a lot of supplies to make something. All you need is a piece of paper. It can be an old magazine paper. It is one of the best ways to recycle. There are amazingly simple and amazingly complex things you can make. Here is a link of some amazing videos for those who need inspiration.
Origami Artist Robert J.Lang- An American Physicist and Origami Artist is one of those who has made this wonderful and old art of folding paper appealing to this generation as well by showing the reach of Origami.
Amazingly inspiring video by Robert Lang on Origami Idea+ Square=Origami
Little more on Origami
3D Swan Origami
Big 3D Origami
Travel to Oriland
Quick Guide to Origami via Internet
Note to All Parents: Encourage your kids to learn crafts, they learn many more things from Crafts than you can imagine. It is definitely not just recreational; it is educational in a fun way.
Tuesday, July 19, 2011
Paper Quilling Flower and Butterfly Note card
I always knew that sharing your skills is a good idea and but didn’t know that it will be so much fun and at the same time will give such creative satisfaction.
This beautiful Paper Quilling note card was created by one of my students - A very talented, soon to be 9 years old girl. She is full of enthusiasm and very eager to learn new concepts and techniques. She made this during her first quilling class.
What amazed me was the ease with which she grasped use of quilling tool, the neatness in her work, considering it was the first time she was quilling. I am sure it came from the efforts she and her mom would have put in doing various kinds of crafts earlier. We believe that if you are good at one craft, it does give you an advantage in learning other kinds of craft. I guess it is something like if you are good in one sport chances are you will do well in others as well.
It gives me immense pleasure to share her creation here. In this class she learnt
- History of quilling
- Tools used for quilling
- Basic quilling shapes : tight coil, loose coil, tear drop shape, scroll
- Different kinds of paper strips used for quilling
- Quilling with multiple colors
- Concept of contrasting colors
- Using Martha Stewart Border Punch
She was very excited throughout the process. Hope she continues to learn this wonderful art and many other beautiful and challenging crafts.
Wednesday, July 13, 2011
Personalised Frame Art and Tissue Paper Flowers
This summer creativity is in air. The summer craft classes are in full swing and I am glad I have such curious and amazing students.
The age range is 6 to 9 yrs and it is a great pleasure to share their lovely creations with all of you.
The above frame art was created by a brother and sister for their father.
The process of creating personaliazed pieces of art is very interesting.
For the same person, different people have different views. Like in this case for their Dad the kids have different opinions. They have different best memories with him.
At such a tender age they do have an opinion and know how to express it. One wants to call their father Dad and one Papa. The boy's memory of the best time he and his father spent together was when he played Cricket with him and the daughter's was when she went to Washington DC with him and she also said she loves it whenever they go outside together.
The picture frame project was designed to capture these special moments. Whenever they will look at the frame it will remind them about the wonderful time they spent together as well as the thought behind the project. Later they put their favorite picture with their father in the frame.
The best thing about the discussion was, it made them super excited about the project. Apart from learning expressing one's thoughts and feelings using craft projects, they learnt about template design, use of templates to cut various shapes,cutting intricate shapes using scissors, different kinds of glues, working with wood, working with self sticking foam and felt. The kids later told their Dad/Papa loved it.
During one of their classes they made tissue paper flowers. They made Fringed double color tissue paper flower and pleated multi-color paper flowers. They came out real well considering they made tissue paper flowers for the first time. Definitely this time the girl liked it more than the boy but I must say that the boy also tries his level best to attempt and enjoy all kinds of crafting challenges. As a teacher it is very fulfilling to see the students enjoy what they do.I wish them all the very best and many more hours of crafting fun.
Tuesday, July 12, 2011
Quilled number 25 for Silver Anniversary Gift
One of my friends, will be celebrating 25 years of her marriage this month. She is an artist herself and has been very encouraging always. I wanted to gift her something special and handmade for this occasion and the idea of quilling the number 25 in silver and white seemed perfect. I used metallic silver and white quilling strips from Quilled Creations . I also added some red hearts to introduce the color of love. The finished project measures about 8" x 6" and is framed in a black shadow box.
Here are few more pictures of the project.
As with most of the quilling projects, this looks much prettier in person.
I hope both of them like the gift. Wishing them many more years of togetherness and love.
Happy Anniversary Ami and Jon!
Here are few more pictures of the project.
As with most of the quilling projects, this looks much prettier in person.
I hope both of them like the gift. Wishing them many more years of togetherness and love.
Happy Anniversary Ami and Jon!
Subscribe to:
Posts (Atom)