Showing posts with label quilled butterfly. Show all posts

Tuesday, August 2, 2011

Paper Quilled Butterfly and Flowers


The day I tried quilling for first time I made these butterfly and flowers and that project has been proudly hanging in my corridor since then. One of my students wanted to make the same design and that's what we made this Friday. It was a fun project. She saw crimped strips in one of the cards I made and wanted to try that and I do think it looks nice.

This project brought back lot of memories of how I stumbled upon the art of quilling and how it has become such a big part of my creative life!

Cheers to quilling :)

Tuesday, July 19, 2011

Paper Quilling Flower and Butterfly Note card


I always knew that sharing your skills is a good idea and but didn’t know that it will be so much fun and at the same time will give such creative satisfaction.
This beautiful Paper Quilling note card was created by one of my students - A very talented, soon to be 9 years old girl. She is full of enthusiasm and very eager to learn new concepts and techniques. She made this during her first quilling class.

What amazed me was the ease with which she grasped use of quilling tool, the neatness in her work, considering it was the first time she was quilling. I am sure it came from the efforts she and her mom would have put in doing various kinds of crafts earlier. We believe that if you are good at one craft, it does give you an advantage in learning other kinds of craft. I guess it is something like if you are good in one sport chances are you will do well in others as well.


It gives me immense pleasure to share her creation here. In this class she learnt

- History of quilling
- Tools used for quilling
- Basic quilling shapes : tight coil, loose coil, tear drop shape, scroll
- Different kinds of paper strips used for quilling
- Quilling with multiple colors
- Concept of contrasting colors
- Using Martha Stewart Border Punch

She was very excited throughout the process. Hope she continues to learn this wonderful art and many other beautiful and challenging crafts.

Sunday, June 5, 2011

Paper Quilling for Kids

I have been taking quilling classes for some time. I was surprised how quick even young kids can pick up this beautiful art. Here are few of my student's creations.

I am so proud :)


Little hands at work!


This was the first one! A quilled butterfly can make anyone fall in love with quilling!


Sunny in Seattle! I love the birds. Adding the rainbow was her idea :).


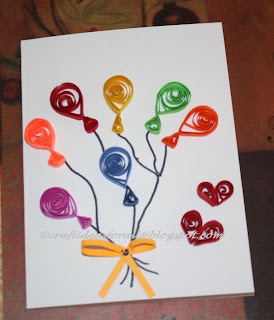
She made the colorful balloons for her baby sister and added two hearts for her Mom and Dad. So thoughtful!


She loves kitties. So we made this quilled cat and mouse duo. Aren't they cute!


A gift tag with quilled dragonfly.


So we decided to make a snowflake. But she did not want it to be white. She wanted one with lots of colors. Who am I to stop! So here we have a colorful snowflake :). Could also pass as a quilled rangoli :).

Earlier I posted some pics of her quilling for Mother's day. Will write a separate post for the Father's Day Project soon. Its nice and bright out here after a long time. Looks like finally summer is here. Hope you all have a great summer!

Wednesday, September 23, 2009

Paper Quilling : Butterfly and flowers

I have always wanted to try paper quilling and this is my first attempt at it. Paper quilling, also called paper filigree is the art of rolling paper strips and pinching/bending them at different places to create various shapes and use them to build patterns.

There are tools available for quilling but you can try the basic art without them too. I did not have the tools and wanted to try it before buying tools.

I used the following supplies to make the quilled butterfly :

1. Paper Strips of different colors ( I cut them myself using paper cutter, you can buy pre-cut quilling strips available in craft stores
2. Bamboo skewer to roll the paper strips
3. Glue

I cut thin paper strips and rolled them using the bamboo skewer.Once you roll the strip , take it off the skewer and leave it to open on its own.
The basic shapes that I have used are tear drop ( by pinching the rolled paper at one end) and petal (by pinching the rolled paper at both ends simultaneously). You can refer this link for other basic shapes used in quilling. Finally, I glued these shaped paper rolls together to create the butterfly.

By the time I had finished the butterfly I knew I will be doing paper quilling more often. So I got the quilling tool from the craft store. I also discovered my paper strips were little wider than the quilling strips available in market. As I got the tool I decided to add flowers to the project. The flower that I have added is called double fringed flower.

Instructions to make the double fringed flower:

Take a 4.5 cm by 10 cm paper strip. Fold it in the center length wise. Cut the strip at approx. 45 degrees along the folded edge as shown. To get uniform width at bottom I held a quilling trip at the open end while cutting the fringes.
Using the quilling tool roll a quilling strip of different color.Glue the other end to the fringed paper strip and roll the strip along. In the end glue the fringed paper strip. Your flower is ready. It definitely made it easy to roll the strip using the tool but you can try it out without one too.

I used shadow boxes to frame this quilled butterfly and flower project as you need some gap between the glass and back of the frame. I loved making this project and you will definitely see more of these paper quilling projects here in future. I hope you get inspired to try this beautiful art too. Happy quilling :).