Showing posts with label seasonal. Show all posts

Monday, December 20, 2010

Easy and unique Christmas ornaments you can make


Purple Sparklie Bird Ornament: This is what my daughter calls this creation of ours. Made of glitter foam sheet and a free hand drawing. This christmas ornament is one of the fastest and cutest creations. Don't you agree. This is my daughter's favorite creation so far. She calls it Sparklie Birdie.

Last few days have been really busy. We were so busy with holiday shopping and crafting that could not publish on blog. However, I have been updating as and when I could.My soon to be 3 yr old daughter is very excited about Christmas this year. Since the day we got the Christmas tree in our house, she is talking about Christmas and all the things related to Christmas. The best part till now is making new ornaments with her. Eventhough our Christmas tree is not very big it still has ample space for many more ornaments. We had a few from previous year's Christmas and we converted some of the previous craft creations into ornaments and now we are making one ornament big or small, easy or complicated every day. It is like our own countdown to the D Day.

We are so excited to share some of our creations till now. We will be updating this post with more pictures,tutorials and tips as and when we keep making it.Making ornaments is fun. Do try it and share your experiences. Feel free to ask if you want to know more about making any of these.


The Classic Ball Ornament: The first ornament made by my daughter with her Dad. One fine saturday afternoon when I was busy shopping for craft supplies at Michaels, my toddler and her dad were busy learning how to decorate a transparent round Christmas ornament. Using some glue dots, glitter, some paint pens my daughter made this beautiful ornament with a little help from her Dad.


Glittery Yarn SnowBall: One of the most fun ornaments for kids to make. We used Yarn on a balloon, stiffened it with glue and let it dry. Blew off the balloon and viola we got this cute Snow Ball. We added the shine of the snow using a silver glue pen.


Photo Ornament: This one is the last year's Ornament. Some of you might have already seen the detailed tutorial for this, for other here is the link.


Paper Porcupine Ornament: This one is our take on the fabulous Polish Porcupine Ornament which we came across recently. We made a smaller version, circles we used were 2 5/8" diameter. We used fine silver glitter to add the sparkle. Detailed tutorial at Jessica Jane's blog How about Orange. Thanks to Ann Martin of All things Paper for inspiring us with creations from amazing artists from all over the world.


Butterfly Ball Ornament: This again is one of the most colorful ornament. Glue gun and Martha stewart Butterfly punch is the key element here. Glue gun makes it so quick and strong. We are really proud of our first glue gun application.


Painted Pine Cone Ornament: My daughter's one of the favorite things to do is to collect pine cones. We have atleast dozens of them. She decided that she has to hang one of these on the Christmas tree as it is a tree thing. So here it is, her pine cone painted yellow in her choice of color and hanging happily on the tree. Interestingly, when you paint the pine cone it shrinks and it again comes back to its shape once dry.


Origami Crane Ornament: Long back we shared a tutorial of Origami Crane. We converted those cute paper cranes into adorable paper crane ornaments. For tutorial click here.

4 Days to go...
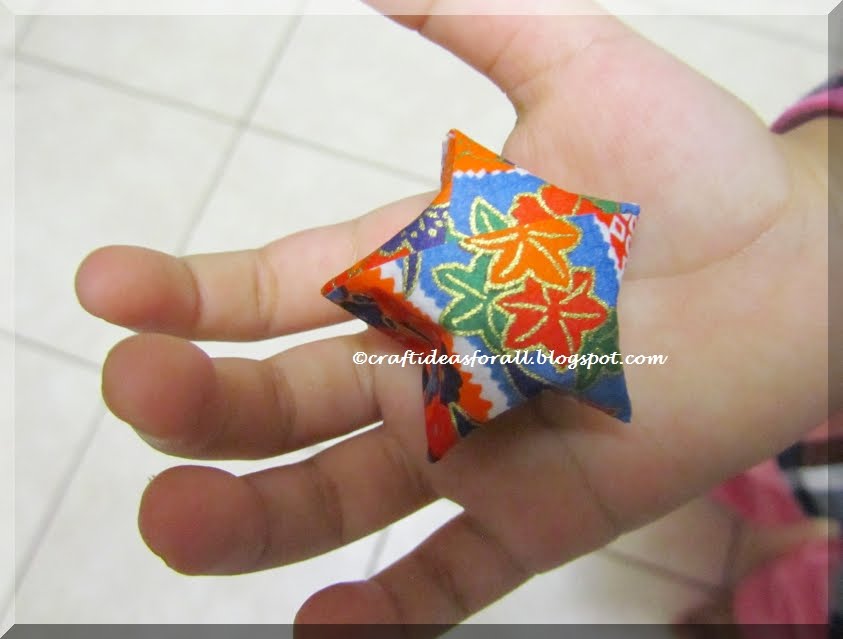

Lucky Origami Star Ornament: Loved this one for the simplicity of making and the fact that this is lucky. Here is a video of how to make it. We made it with Japanese Washi Paper, which as a matter of fact I bought myself during my Japan Trip from the famous shop Tokyu Hands. This is one of those where multiples look even better. I plan to make more if time permits.

Other than these we have some wrapped candy canes, a lantern made at Children's museum last weekend, Woody of Toy story fame converted into ornament ourselves and some glittery red and golden ball ornaments.

Monday, November 29, 2010

Thanksgiving Table Centerpiece


Happy Thanksgiving to all. Hope all of you had a wonderful time with family and friends. This year we did loads of shopping and some quick craft too.
It was an improvisation over a craft I made earlier. It did not take much time and it did brighten our little thansgiving table.

Supplies
:

Candle stand
Artificial Fall leaves
Turkey

You can use any Turkey craft you made or any turkey toy at hand. The one I used was made of origami paper using very simple techniques and some self sticking foam sheets. For detailed instructions on how to make Paper Turkey click here.

Simply wind the fall leaves stem around the candle stand. Use a length which is suitable to your candle stand. There are no hard and fast rules here. Just make sure it is away from the flame. Keep the turkey near the candle stand.
Your beautiful and easy Thanksgiving Centerpiece is ready.
If you are interested in knowing more about Thanksgiving in United States click here.
Thanksgiving is celebrated in different countries on different days. For example in Canada, Thanksgiving is the second Monday in October. Thanksgiving is celebrated all around the world to thank Lord for bountiful harvest, His blessings and the prosperity that he bestowed upon us.There are variations in the way it is celebrated and the day it is celebrated. You can read about it here. However, the underlying theme of this wonderful festival remains the same. Thanking God for everything. We use this opportunity to thank God, our family and friends.
Happy TURKEY Day.

Wednesday, October 20, 2010

Pumpkin bat craft


The cutest PURPLE PUMPKIN BAT CRAFT ever....

This sparkly purple bat is the cutest Pumpkin craft this Halloween season. Finally a Halloween Craft which kids adore.
My 32 month old daughter made it recently at one of the craft workshops at Michaels.
While I was shopping for some clothes for my recent invitation to Oprah show taping, my daughter was busy crafting this lovely and adorable PURPLE PUMPKIN BAT.
By the time I decided what to wear for Oprah show, her craft was ready.I had no clue what they were doing all this time. Thanks to her dad. Both Father and daughter were ecstatic and so proud of this creation.

Recently,my daughter's favorite color has become Purple next to Pink.She was delighted to see the color choice as Purple.

I just wanted to share the picture of this Purple Pumpkin Bat Craft as this is my daughter's first Pumpkin Creation and really this is the cutest thing I have seen this Halloween. My daughter who didn't like the spooky spiders on the Pumpkin that I made this season (she is really scared of them) has fallen in love with her own Pumpkin creation.
I cannot forget the sparkle in her eyes when she told me "Mommy I made it myself". Don't touch it. Let it dry, and so on. She was non-stop explaining all the steps of creating it. After the entire story she said I made it for "ATTA" - for her birthday gift.She is her best friend, I must say. We were about to go to one of our family friend's birthday party the very same evening.

It is a different thing that she wanted her Purple Pumpkin back after two days. So the Pumkin is back with her. A return gift from her favourite ATTA.

The only thing that bothered her most was "The Pumpkin has only two teeth". "But I wanted to make more". One of these days I am going to let her as many teeth as she wants for the PURPLE PUMPKIN. She wants to make as many teeth as she has for the Purple Pumpkin Bat she has made.

The shining (read Glitter) they let her put on the Pumpkin was a big hit. Also, the feathers.
I must say this is a perfect craft for a toddler who loves to craft.
She also told me that Boys were making Pumpkin Spider which was black. But, she made Pumpkin Bat as it is beautiful and it is PURPLE.
Though I have not seen how they created it. I think this is a very interesting and easy craft which a child can make with little help and supervision of an Adult.
I guess this is how you can make it too.

Supplies you will need:
-Craft pumpkin
-Foam Brush
-Purple water based color
-Glue based Glitter Pen -Purple
-Feathers
-Foam sheet purple for ears and wings
-Scissors
-Google eyes large
-Cotton
-Paint brush
-Black water based color
-Cotton ball for nose

Color the Pumpkin. Simply use glue gun to fix the feather, foam sheet ears and wings,google eyes,nose. Kids take help of parents or some Adult while using glue gun. Decorate with glitter and paint the teeth.
It makes great decoration for Halloween. Ours is sitting in the Yard till it does not rain.


Tips: After painiting it in the color of your choice let the Pumpkin Dry.
To make it more exciting use Glow in the Dark Glitter. It is available at Michaels.

Thursday, October 7, 2010

Spooky Spiders on Pumpkin


Aren't these spiders SPOOKY !! These crawling spooky spiders on the pumpkin make a perfect centerpiece for Halloween. A great Halloween craft that kids can make.
My daughter thinks they are real Spiders. She says mommy they are so Scary. Well, this is what we want on Halloween. So really happy how this turned out.
Let us all make it this Halloween.


Supplies needed -

For one spider

-Craft Pom poms balls black 2 no.s
-Chenille stems black standard lengths 2 no.s
-Chenille stems black 2 inch piece
-Craft Glue
-Scissors
-Google eyes (optional)

For Pumpkin arrangement

-Craft Pumpkin also called carvable pumpkin

-Spiders 3 no.s


Step by Step Instructions -

1. Refer the pictures to make the spider. Take two pom poms and glue them together.
2. Cut the chenille stems such that you have four equal lengths.
3. Hold these together and using the 2 inch piece of chenille stem tie them together
as shown in the picture above.
4. Now using glue stick the pom poms you prepared in step 1. Let it dry.
5. Make two more spiders following the steps 1 to 4.


Now take the craft pumpkin and decide where you want to place the spiders. Hold one spider in your hand and carefully insert the spider legs in the pumpkin. Since chenille stems have wire inside they are so easy to insert in the craft pumpkin which is usually made of styrofoam or similar kind of material.

Similarly decorate your pumpkin with more spiders. Your spooky spider pumpkin arrangement is ready. You can use it as a centerpiece or as part of a big collection of pumpkins and other halloween crafts.

Happy Halloween !! Happy crafting.


Tips

-Parents supervise younger kids while using scissors.

-If you think your child will pull the pom poms you can secure it better by sewing instead of using glue. They are more sturdy this way.

- Use different colors of chenille stems to make spiders more attractive. Let your child use his imagination.

-If your child loves google eyes on every craft he makes, you can use them on spider as well.

Saturday, July 10, 2010

Pumpkin Craft for Halloween Decorations


In the spirit of Halloween here comes the most awaited Pumpkin Craft. I have made it this year to celebrate the festivities in my own way.It can be used as a centerpiece of your Thanksgiving table and will also make a great hostess gift for dinner invitations.

This fabulous craft is really easy to make and you can have multiple variations with the same supplies.Following supplies are required for the project:
- Craft Pumpkin - Medium size
- 2" wide Ribbon -3 feet your choice of Halloween themed colors
- Floral Wire
- Floral Tape
- Maple leaves bush -12-15 medium sized leaves in shades of Halloween themed colors like Orange, Green and Brown with glitter.
- Duplex paper - Orange color
- Three varieties of Halloween themed colored bush - Recommended varieties orange and dark brown bush, one bunch each.
- Scissors
- Craft knife
- Glue
For working with craft pumpkin the first step is to place it on a surface in such a way that it is accessible from all the sides easily and you can have a good view from all sides as well. Refer the picture and start marking on the pumpkin as to where you want to put the maple leaves.

In order to insert the maple leaves and bushes you have to prepare them. Cut them so that you have individual pieces (if you bought a creeper). Add wire to each leaf and individual piece of bush and wrap with floral tape.

Make small slits in the craft pumpkin using craft knife. Insert the leaves and bushes in the pumpkin. Secure them with glue. Also insert the flowers made out of duplex paper. You can make any kind of flowers as long as they are shades of Halloween themed colors.

If you do not want to make the flowers yourself, silk flowers of similar colors can be used to complete the arrangement.

Refer to my earlier posts to make double crepe paper flowers.
Finish the arrangement with the bow you made from the ribbon of your choice. Attaching wire to the bow makes it easy to secure in the pumpkin vase.


Tips: This arrangement can also be prepared using natural fall colored leaves. You just have to be little careful not to break them while inserting.
You can add a scarecrow to it too. Adding a crafted spider makes it little spooky too. It makes a great window display for the Halloween season.

Tuesday, December 22, 2009

Snowman Christmas Wreath


Last night when I was back from shopping and was unlocking my front door it looked plain. That inspired this Snowman Christmas wreath. Luckily I had the plain Christmas wreath from my last visit to Michaels. This Snowman wreath is result of the supplies I already at home. Thanks to my various projects earlier.

Supplies you need
-Christmas Wreath (not decorated)
-Wired Ribbon or Bow
-Wire
-Snowman toy
-Christmas Ornaments Gold color
-Berry bunches
-Garland -Silver

The bow is made by making loops of the wired ribbon holding it between your thumb and index finger and then winding a wire at center. Cut the ends as shown in the pictures. The ornaments and the berries are joined together using wire and then tied on the wreath. Snowman is also fixed using wire. Pierce two holes about 1 inch apart at the base and pass wire through it. Use the wire ends to tie them to the wreath. The beautiful Snowman Christmas is ready to be hung.

Tip: You can decorate your wreath with pine cones, different colors of ornaments anything that you feel adds to festivity. Gold, Silver and Red colored ornaments are the most popular ones.

Monday, December 21, 2009

Simple Christmas Wreath


This simple christmas wreath is easy to make too. You can use this for your christmas decoration in multiple ways. As a Christmas wreath on your front door or to make your existing decoration extra special. I have used this as a decorative base to my wedding ring holder. You can use this as decorating any ceramic piece of art, eg a ceramic fairy.

Supplies you need:

Chrismas wreath (readymade basic)
Double crepe paper - Red
Pollens
Floral Wire- 12 pieces of 2 inches
Scissors
Glue

Plain green christmas wreath is available in craft stores in various sizes.
For making this Bouganvillea wreath you will need 12 bouganvillea flowers. You can increase the number of flowers if your wreath is bigger.

For making one Bouganvillea crepe flower you need to cut 3 petals from red double crepe paper.
Use the template in 100% size. As explained in detail in some previous posts attach pollen to the floral wire. Now using your thumb curve the cut petals outside. As shown in picture attach 3 petals around the pollen using glue to make one Bouganvillea flower. Repeat to make the rest of the flowers. At equal distances fix the flower on the wreath by winding the floral wire around it. The simple yet beautiful Christmas Wreath is ready.
Have fun and Merry Christmas.

Thursday, December 17, 2009

Kitty Cat Refrigerator Magnet


Today was like one of those days when I end up making a quick and cute craft with my daughter with no previous plan. In fact I must say she was the one who inspired me for this craft. She has a Hello Kitty purse and said draw Kitty cat. She was not impressed by my drawing of it on Doodle Pro. She then said make Kitty cat.
Just like a flash I got an idea of creating a Refrigerator Magnet of Kitty cat inspired from the cute face of famous Hello Kitty series. This is how I made this craft with my 23 month old daughter.

Supplies you will need:
-Air dry clay white
-Acrylic Paint: Red, White, Yellow and Black
-Painting bush
-Craft Glue
-Magnetic strip
-Craft knife or Scissors
I used one pack of Crayola Model Magic Single packs. Just follow the illustrations to make this project. It is that simple. Detailed step wise instructions to make Kitty cat craft :Just in case you need them.
Use the existing width of the clay pack (roughly 1 ½”) cut a length of about 1”. Use the existing thickness of the clay (roughly 1/3”). If there are cracks use little water to moisten it and then you might want to roll it to a rectangle of 1 ½” by 1” and thickness of 1/3”.
To make two ears take around 1/4 inch diameter ball of Crayola Model Magic clay and then shape it like a pointed triangle. Use the rest of the clay to make the bow. Add two drops of acrylic clay to make it pink. Mix it well. Bow is made by sticking 3 pieces together. To a small ball of clay attach two ends of flattened clay as shown in the picture. The completed bow measures around 1”. Glue the ears and bow to the face. When dried (about 1 hour or so), paint the bow in any color you like. Paint the eyes, nose and the whiskers. You can make this completed Kitty cat face as a Christmas tree ornament using a hook or a refrigerator magnet by sticking the magnetic strip piece on the back. Voila! the cute Kitty Cat craft is ready for your toddler to enjoy.


Tips- With a little adult supervision Toddlers can enjoy this craft. It is okay if they smudge the paint a little. Idea is they have fun.
- If you do not have magnetic strip you can use the back of any other magnetic sample credit card or business card you get in ad mail. I used the back of a Subway Sandwich address card. Just peel the ad part with craft knife and what you get is self sticking magnetic strip.

Tuesday, December 15, 2009

Festive Theme Handmade Clay Flower Arrangement


I love making clay flowers. This flower arrangement is one of my favorites. It has just one rose but its simplicity is what appeals to me. The colors red and white remind me of the festivity of Christmas and Snow in winter season.

Following supplies are needed for the project :

- Air dry clay - Red, White and Green( I used Deco brand colored clay for red rose. You can add color to white air dry clay to get the colored clay)
- Floral Wire and Wire cutter
- Red Pollens
- Floral tape
- Pointed clay tool or a bamboo skewer or a toothpick (for white flowers)
- Acrylic or any water based paint (to color the clay)
- Scissors
- Flower vase

Refer our previous posts on clay flowers for instructions to make clay roses, cherry blossoms and the fillers. The only difference between the white flowers and the cherry blossoms illustrated in previous post is that I have not cut notches in the petals. Make sufficient number of white flowers to surround the rose in the center. I ended up making 16 of them. Add the green fillers and leaves to complete the arrangement.

Hope you get inspired to make one this festive season. Mine is proudly displayed as a center piece on our dining table.

Sunday, December 13, 2009

Quick and Easy Handmade Christmas Photo Ornament


Like many of you I have already set up the Christmas tree and the lights are already twinkling. Every year I decorate the tree in my own way. Yes, you guessed it right - most of my ornaments are handmade. This year I made one with my daughter. She was more excited about this quick and easy Christmas photo ornament. Excited because it was her photo that I was about to put. The photograph we chose is the one where she is mere 6 months old and giving that perfect smile. I suggest you let your child pick their favorites if they are old enough to do so. Let me walk you through this project quickly.

Supplies you will need:
- Card stock white
- Child's photo
- Scissors
- Glue
- Paper Quilling strips : white and red
- Glitter
- Ribbon : Golden color
- Paper quilling tool or barbecue stick

This is a very easy project.Cut the photo into a 2" diameter circle and the outer card stock into 2 pieces of 2.5" diameter circle.

The lace is glued using all purpose glue. As it is a circle, making little pleats make the work easier and neater. I have used the easiest of the paper quilling shapes - the coil. Alternate red and white quilled coils are used to make the border.You can use any shape you like.You can have a look at our older posts on Paper quilling for basic shapes. I added glitter to the coils to make them more festive.

Follow the step by step illustration to complete the project.


Give the ornament to your kid to hang it on his/her favorite spot. Every-time my daughter looks at this ornament she is so delighted and says " Mommy made it", "Nice".Believe me it is the best compliment you can get for your craft project.

This project is worth a shot this Christmas. Happy crafting and Merry Christmas to you all!

Tip: Photo ornaments are better with pictures of close up faces.

Tuesday, November 17, 2009

Celebrate Thanksgiving with Turkey Craft


Here is a quick and interesting Turkey craft I created using mixed media. I used Origami paper and foam sheets of various colors. It can be used as simple decoration, a centerpiece on Thanksgiving dinner table or as a place card too. All you have to do is to make more of them and add the name tags to it.

Supplies required:
- Origami Sheets 7" square- Orange, Yellow, Brown and Dark Pink
- Self sticking foam sheet- Brown, Red, Yellow and Maroon
- Glue
- Scissors
- Craft knife
- Scotch tape
- Wiggle eyes

To make the Turkey craft the first step is to make accordion folds of all the Origami sheets. Fold them in half as seen in the pictures. Now cut the orange sheet from the center. For this Turkey craft we need just one part of the cut orange sheet accordion.


Arrange the sheets as shown in the picture and stick it with glue or scotch tape. Feathers for the Turkey craft are ready.

Now take the brown foam sheet and measure it so that it reaches two thirds of the height of the turkey feathers. Refer the step by step instructions and cut out the body of the Turkey. Also, cut out the other parts using different colors of foam sheets.

Assemble the foam cutouts to make turkey's body. Once done, glue the wiggle eyes.

Now glue the foam sheet body at the center of the feathers. The easy Turkey craft is ready to be used as a piece of wall art, centerpiece on the Thanksgiving table or a place card. Happy Thanksgiving!

P.S. : Yay! This is our 50th post already :). Hope you all are enjoying them as much as we are !

Wednesday, October 28, 2009

Origami Bat : Wall Piece for Halloween Decoration

After I made the Owl wall piece using the Origami technique, I felt like creating more of the kind. With halloween round the corner it made me all the more excited to do this. Here comes the Spooky Bat wall piece. I must say this is much easier than the Owl and they look great together.

Supplies I used:

- Origami paper (double shaded not mandatory though) 7"
- Foam sheets (self sticking): Brown, Glitter-- Red,Silver, Green
- Scotch tape

Follow the steps in the pictures below. Refer to basic techniques for origami discussed in previous posts.


Add eyes and mouth to the bat. Hang the Bat upside down as they are usually hung upside down. Use a dark blue background to depict dark sky. You can create the background with moon or flowers too. It is all upto your taste.

I have used Silver background to make the Halloween series as a set.They make lovely wall decorations for my kiddo.Here is a picture of the set.


Happy Halloween to all. Have fun.

Origami Owl : Wall piece for Halloween Decoration

Creating this cute Origami Owl as a wall decoration is lots of fun. It is an interesting activity for a little older kids. If you have tried origami earlier it is a bit easier. You can refer to earlier posts for little simpler origami ideas.
However, for Halloween it is a must try.

Supplies required:

- Orange Origami paper 6"
- Self sticking Foam sheets Brown,Black and Glitter green, Glitter silver
- Craft Knife
- Black Card stock for background

On a clean hard surface fold the orange origami paper as indicated step by step in the picture. It is important to make folds in one go as the paper is usually a bit fragile. I have used Melissa Doug Origami Paper.

To make the folds little easier fold the paper in half horizontally and unfold, then fold is vertically and unfold and then fold and unfold both diagonals too. Make crisp crease in every fold. This will make the rest of the folds easier to make.
Now with the square paper and the white side up. Fold the paper diagonally so that you can see the orange color now. Refer the picture.Next step is to lift the corner and do the squash fold. You get a square as a result. Turn and repeat the step.


At step 5 keep the resulting square as shown and fold the left and right sides of the top layer at the center you get you have a diamond shape. Turn over and repeat the steps. Fold the rest of the part also as shown.


Now lift the top layer so that it opens up. Follow the crease and keep pulling gently till the left and right sides meet at the center. Refer to the picture. Make a good crease. Turn over and repeat. Now lift the tip and fold it half way as shown. Flip and repeat.


Fold the left and right sides towards in such a way that it still remains a diamond shape. Turn and repeat on the other side too. The are two free pointy ends which we will use to make wings. Pull out this free end gently and away from the body. Refer the picture. Do this for both free ends.


To make the head fold the top part half way and then fold the tip again to make the beak. For making feet fold around 1/2 inch both in the front and in the back.


Once the Owl is ready cut out the branch of the tree as shown in the final picture and some leaves. You can use your imagination and create a scenery. You can add some flowers too.

To give it a framed appearance I have used Glitter silver self sticking foam. Foam sheets are easily available in craft stores like Michaels or even in Walmart.

The fabulous Origami Owl wall decoration is ready. Enjoy Halloween to the fullest.

Friday, October 23, 2009

Spooky Bat and Owl for Halloween using Yarn


Halloween is nearby and here's a spooky yet cute craft idea for Halloween decorations. We will be making a bat and a owl using yarn pom poms. Kids would love to make this project but will need some supervision.

There was an earlier post on making a spider with yarn pom pom. Here is another way to make pom pom using yarn. This one takes little more effort but is neater than than the previous one. Refer the picture below for step by step instructions( Click the image for a bigger pic). Start with cutting two circles out of a cardboard. I used cereal boxes :). Cut smaller circles at the center of both these cutouts (like a doughnut). The diameter of outer circle determines the size of the pom pom.

Place both the circle cutouts superimposing each other and wrap the yarn around them. Then using scissors cut the yarn along the circles edges between the two circles. Take a small piece of yarn and tie it between the two circles. Cut the excess off and remove the circles. Your pom pom is ready.This is the basic step for our craft project.


The supplies required for this Halloween themed project :
- Black yarn
- Foam sheets ( black and orange)
- Glue and Scissors
- Wiggle eyes
- Cardboard
- Transparent cord ( if you want to hang the decorations) and needle

For the Bat :

Make two pom poms using black yarn for the face and body of bat. I used 1 inch diameter and 2.5 inch diameter for mine. Cut out bat wings and ears using the foam sheet.Attach the smaller pompom on top of the bigger one. Glue the wings to the backside. Add wiggle eyes and a spooky bat is ready to be used for Halloween decor. You can place these bats at multiple locations in your house, near plants, on bookshelves etc as is. If you want take the transparent cord and using a needle , thread it through the bottom of the bat to make window decorations.
The effect is the best with multiple bats suspended at varying heights.

For the Owl:

Make two pom poms using black yarn for the face and body of bat. I used 1 inch diameter and 2.5 inch diameter for mine. Cut out owl feathers and feet using the foam sheet.

Attach the smaller pompom on top of the bigger one. Glue the feathers on the front. Add wiggle eyes and feet and beak cut from foam sheet and the cutest Owl is ready to be used for your Halloween decor. You can place these at multiple locations in your house, near plants, on bookshelves etc as is.

If you want, take the transparent cord and using a needle , thread it through the bottom of the bat to make window decorations. The effect is the best with multiple Owls suspended at varying heights.


You can also make a combination of Owl, bats, and the spooky spider for your decorations. I am sure you will enjoy making these creatures as much as the kids :). Happy Halloween!