Showing posts with label paper quilling craft. Show all posts

Monday, June 20, 2011

Paper Quilled Baby Girl Card on our Etsy Shop


It is always wonderful to create unique greeting cards for New Parents or Expectant Parents. I am sure this card will bring smile on the face of the recepients.I loved making this cute paper quilling card to welcome a Baby Girl. The quilled Baby stroller, beautiful pink feet, baby bottle, and a cute yellow duck make this a perfect baby card.

This handmade paper quilling card is a gift in itself. Many recipients choose to frame it in a shadow box and use as a keepsake for baby’s room décor.

I had given a similar card to one of my friends and their appreciation inspired putting this on our online Etsy Shop.

It gives us an immense pleasure to enter this card for Challenge 10 - June 2011 - Card for a baby girl or boy! on the Quilling Challenge Blog- Take a Quill Pill

Monday, March 14, 2011

Green gift box- St. Patrick's Day craft


With St. Patrick's day around the corner, wanted to share one of our favorite creation in green. This was a custom order for one of our friends.
It is a gift box made in green using quilling technique. For more quilling creations click here.

Probably by now you know that recently we have launched our online shop Navanka Creations.Now,you can buy our creations.We do take custom orders and you can convo through our etsy shop which means you cna communicate through etsy for your need or else you can reach us at navanka.creations@gmail.com also and we can make a special listing for you on our Etsy shop.

It would be our pleasure to know your opinion about the items listed and which one of our previous creations you would like to be available for sale. Ideas for new product lines are also welcome.

We will keep updating our shop and this blog from time to time so keep visiting.

Some of you know the significance of green on St Patrick's Day. Hence, this green gift box. For those who want to know more about St. Patrick's Day click here.

Wishing all Irish people and all those who celebrate St. Patrick's Day and everyone else too A very Happy St. Patrick's Day. May this bring happiness and prosperity to all. Wish all of you find your pot of gold at the end of the rainbow.Just make sure you reach in time.

As far as this above Green Gift Box is concerned, it turned into Pot of Gold when it was filled with Hershey's Kisses(the one with golden wrapper). Isn't it a great idea for making kids happy.

Happy St. Patrick's Day once again.

Friday, January 14, 2011

Happy New Year 2011


Wishing all our readers a very HAPPY NEW YEAR 2011.
This New Year brings a new approach to our crafts adventure. With more focus on what our readers want and also on young artists we will take our endeavour to a whole new level. Hey, it is sounding like a New Year's Resolution, with just the difference that we didn't realise it is one. We hope to come upto expectations of our admirers.

This greeting card is one of our latest creations. It highlights how a simple design can be so pleasing and refreshing. The bright blue in the window depicts a new day, the quilled and punched flowers depict the newness and freshness of the new day of the year. The lace used for window decoration adds warmth to the whole feeling.

Supplies you will need:
- Blank greeting card
- Textured card stock for vase
- Flowers of your choice ( Quilled rose flower and punched hydrangea)
- Blue and white card stock
- Paper trimmer (optional)
- Scissors
- Glue

Cut a blue rectangle for a window. Decide on size based on the greeting card size. Outline the window with white paper strip. Cut the textured card stock in shape of a vase. Assemble all pieces as shown in the picture. Let it dry.
Write a lovely message and give it to a loved one. This is a lovely greeting card for someone who has moved to a new home too.

Tip: To make quilled rose refer to our earlier post

Wednesday, December 1, 2010

Snowflake Craft


Today was the season's first snowfall here. I have always loved the beauty of the first snowfall, when it is pristine. Today my daughter was so excited to see the snowfall. It was really interesting to see her as excited as me.
Then came the idea of making another snowflake. Snowflake craft is one of the most popular winter crafts and there are so many ways everyone tries to make it. My favorite one till date is paper quilled snowflake. There are so many snowflakes people have made which you can find over the internet, but the most satisfaction you get is from the one you create yourself. Do give it a try. It is not as difficult as it seems at first.
If you take care of few things while you make the snowflake you will definitely get a perfect snowflake.

This is what I learned from my attempts of making a perfect snowflake.
- When you look closely you will find that paper quilled snowflake is a geometric shape with some basic simple quilling shapes. Just try to figure out the pattern. Remember perfection is the key here.
- A quilling grid and circle sizer comes handy while making any geometrical pattern like snowflake.
-No matter how perfect you think you can make without a circle grid, you end up making some little mistake and the whole effort of making a perfect snowflake goes waste.
- It helps to design the snowflake first and then put it under a parchment paperwhile making it. That way you can get the guidance needed and save the design for making it later.
- You get better at every attmept of making snowflake, learn from your attempts and try to make better each time.

Paper quilled snowflake is perfect for making a christmas ornament too. A little glitter on it and a silver ribbon, transparent thread or fish line can make your snowflake a perfect christmas ornament to cherish for years to come. Just make sure you handle it carefully and properly store in a box after christmas.

Supplies:
- 1/8 inches of white pre cut paper quilling strips or you can cut your own too.
- Quilling tool or a barbeque stick with a little slit at the top.
-Glue
-Toothpick and brush to apply glue
-Piece of silver or transparent thread if you want to make ornament.
-Glitter (optional)

Snowflake craft tutorial
-Follow the design in the picture and make the basic quilling shapes.
-For a crash course on quilling shapes click here
-Once the shapes are ready glue them using a toothpick or a pointed glue bottle. Let it dry completely.
-Using a brush apply little glue of the surface of snow flake. Slowly add fine glitter in silver or a color of your choice

Tips
-Any white paper of the thickness of normal printing paper or a gift wrap is fine for making your own quilling strips.
-You can use a paper cutter or simply a ruler on cutting mat and a craft knife is also fine.
-Usually scissors are not recommended as it is difficult to get straight cuts with them however if you are confident give it a try.

Wednesday, November 3, 2010

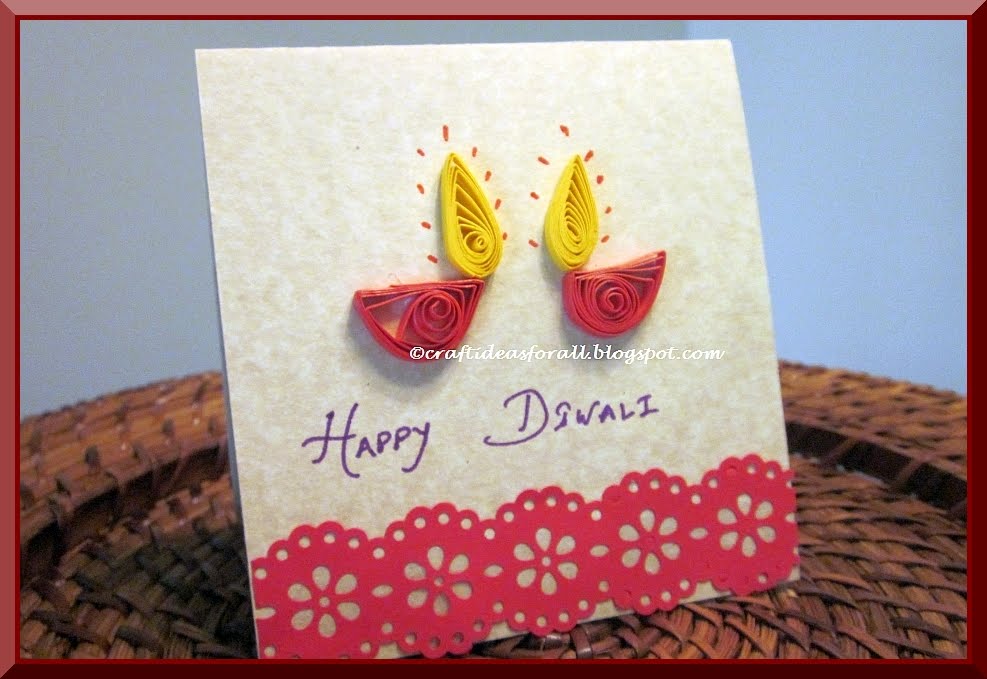
Happy Diwali Greeting Card


Happy Diwali to all who celebrate Diwali. Diwali is a festival of lights. Diwali or Deepawali is celebrated by decorating houses with lights in various forms. Deepawali's literal meaning is row of Deeps. "Deep(Sanskrit)" or "Diya (Hindi)" as they are called in hindi are small clay lamps integral part of this celebration. They are used during prayers to Lord Ganesha and Goddess Lakshmi and also decorating all around the house, inside and out. It signifies the house will prosper and the light from the "Diya" will bring brightness in their lives. This festival signifies the triumph of Good over Evil. For more on Diwali click here. Since, no Diwali is complete without Diyas it is has become the most popular theme of the greeting cards we make or buy for our family and friends. So this year we decided to make one with this theme.

This is a simple greeting card made with very basic quilling shapes. With a little supervision kids can make these too.

Supplies needed

- Paper quilling strips 1/8" 2 yellow, 2 Red

- PVC Glue quick and clear drying

- Markers

- Red paper

- Card stock or plain greeting card

- Martha stewart Punch Doily

I have used basic tear drop shape for the flame of the Diya. The half moon shape which I have pinched a little more in one side to make it more pointed resembles the shape of Diya.
For basics on paper quilling and the basic shapes check out our previous posts on Paper Quilling.

Glue these shapes as shown and glue or tape the punched doily of your choice.

For younger kids you can make the paper quilled shapes and they can enjoy assembling these shapes in the form of Diyas and making their own cards..

Tips:
1.If you do not have pre-cut paper quilling strips you can cut them using scissors or a paper cutter. You can use magazine papers or gift wrap papers.

2.If you do not have a punch, you can use a colorful ribbon instead.